It could take months to explore everything that Grand Staircase – Escalante National Monument has to offer. 1.9 million acres is a lot to cover and a lot to research. This national monument is incredible and we were happily overwhelmed with options of hikes to do.
Hiking and camping seem to be the main thing to do in this area. There are strict rules regarding mountain biking and ATVing and no trails for them. If you have done any research on the hikes here you know that there are hikes for everyone. Half a mile and easy to 15+ miles and strenuous. Since we were not staying in the area, we were not able to do any of the long distance hikes (mostly because of the heat), but we did find some amazing half day hikes to slot canyons and a waterfall.
Here are four easy-moderate hikes that are sure to excite and challenge.
Four awesome half day hikes in Grand Staircase – Escalante National Monument.
Zebra Slot Canyon
Hiking Zebra Slot Canyon
Miles: 6.5 ♦ Elevation Change : 100 ♦ Trail Type: Out and Back ♦ Trail: Easy
Hike 27/52 in the Challenge!
We were fore warned that it could be a difficult canyon to find. We stopped at the visitor center to make sure that it was open for hiking and they mentioned it was. I think it was a bit of overkill with the saying the trail was hard to find. We actually were delayed because we kept thinking that we missed the trail. The trail is easy to find and you don’t turn off of it until you hit a major wash.
But let’s start from the beginning. After you park, head across the gravel road to the trail.

This trail is sandy and hot. Make sure to bring plenty of water. The hike at first isn’t much. Desert scrub and no shade. The sandy trail moves through washes, up and down sand hills and finally at around 1.3 miles you reach this cattle gate. Just push right on through.

The trail stays the same but you are walking through some beautiful rock formations.

After this some might get confused and think that they need to keep taking a left off the trail. This is wrong. Continue on the main trail without detouring off. We took two wrong left turns instead of just staying on the trail.

The place you take the left is at the BIG wash. This one is one you will not miss or be confused about.

After you take the left here it’s about .75 of a mile left until you reach the entrance to the slot canyon.

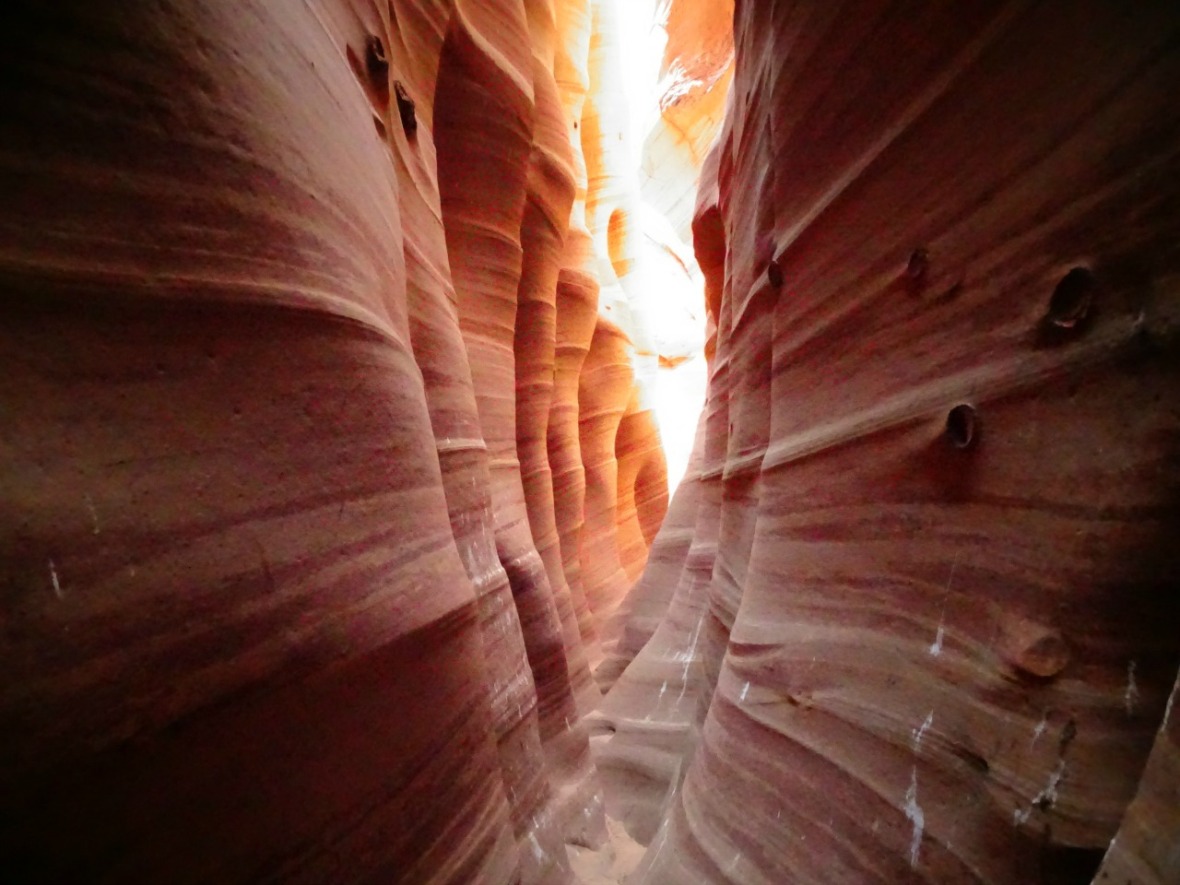
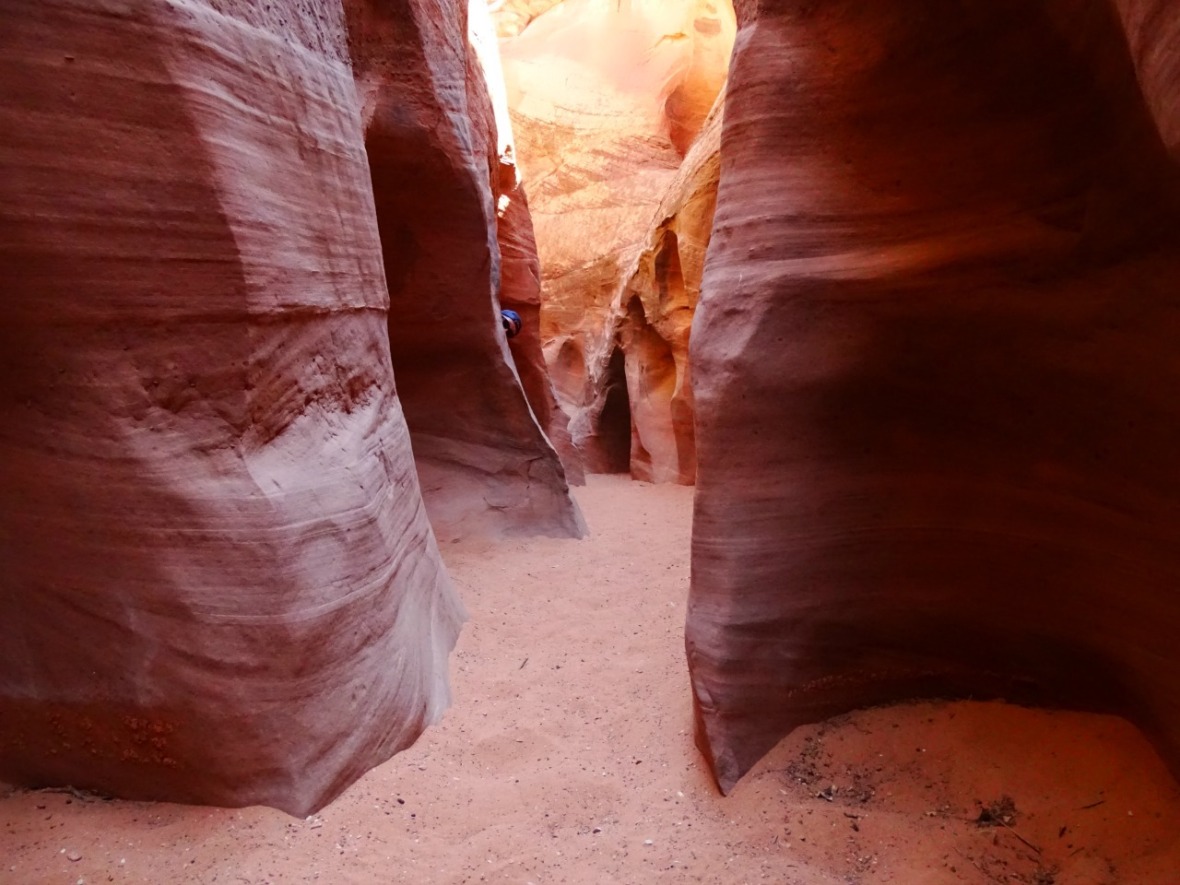
It starts out comfortable and then gets very narrow. You will need to scramble up and over some rocks in the narrow canyon.


But eventually you reach the highlight. The place where all the pictures are from. It was pretty amazing! The weird part about it was all the bird poop and dead crows. It was a little spooky, but still really fun getting through.

After you get through the fun zebra stripes, you can continue on for a little bit. However, there are two jumps that are not easy to make and we decided to turn around. A couple kids made it but there was nothing to grab onto after you jumped or before with maybe 10 foot drops below.

Climbing back down was a bit difficult too Make sure you do not attempt unless you are confident on your feet.

I still loved exploring and chatting with the people that were there. It’s rare when you are around this many people with trail etiquette. Plus they helped me get up and down when Kevin had to make sure that I didn’t fall backwards! So one last picture of this beautiful canyon.
Getting To Zebra Slot Canyon
The trail head is down Hole In The Rock Road. A very long gravel, bumpy and pot hole filled road. It takes a little longer than you think. Make sure to leave enough time for the drive. After the third cattle grate and about 7.8 miles the parking lot is on the right. People are able to camp at trail heads. So if you are able to, it’s worth staying there to get an early start if you are there in the summer.

Coordinates to parking lot for trail head: 37.639387, -111.445590
Normally very busy this trail had very few people in July. An early start will help too.
Willis Creek Slot Canyon
Hiking Willis Creek Slot Canyon
Miles: 4.5 ♦ Elevation Change : 10 ♦ Trail Type: Out and Back ♦ Trail: Easy
Hike 28/52 in the Challenge!
Across the road from the small parking lot is the start of the trail.

Don’t stay on here too long. Head to the right and safely make it into the canyon.

This trail can go farther than we went, but we wanted to head back because of the dogs. The great thing was that the stream ran the entire way. Ramey loved playing and splashing in and out. After a short time the canyon showed it’s beautiful colors.

Each was short. The hike was through a short slot canyon, to the wide open canyon, back to the short narrow slot canyon. We finally got a family picture!
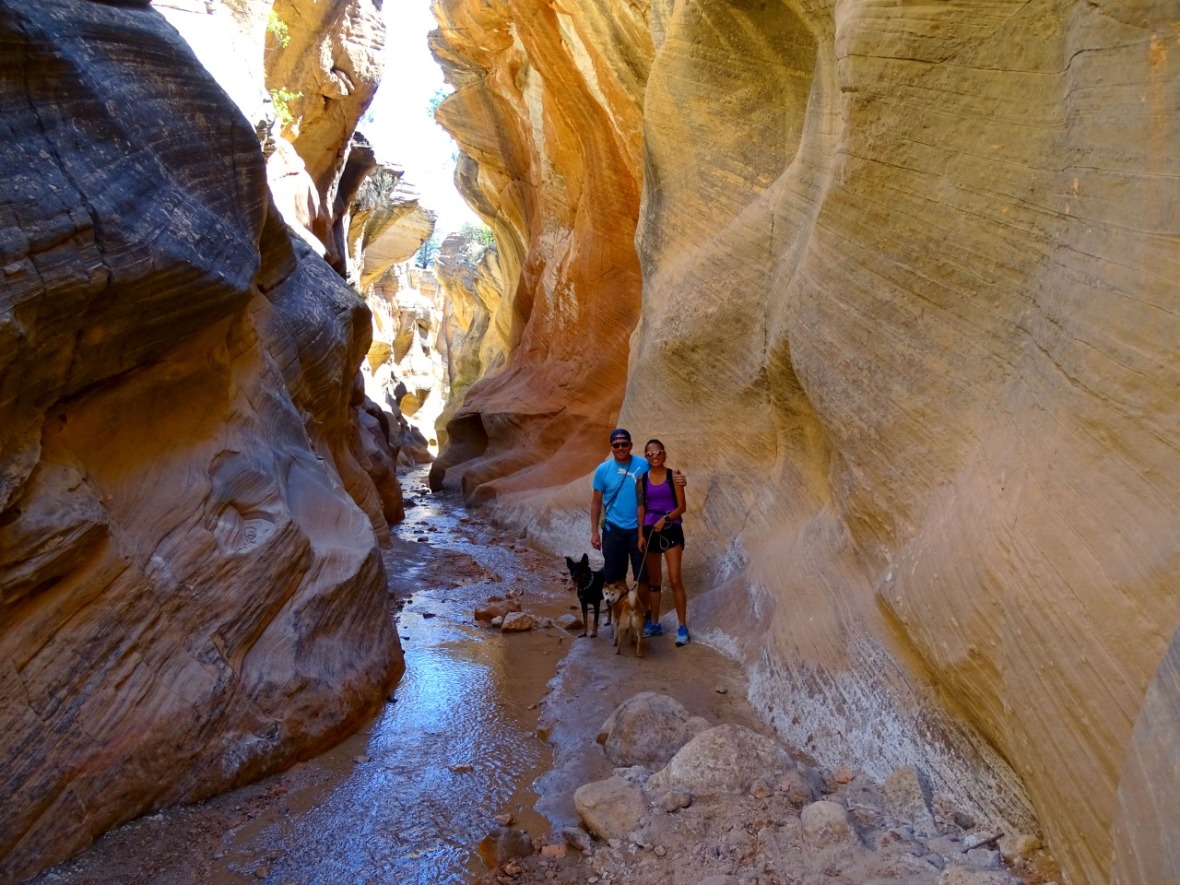
We were so happy that there were dog friendly hikes in this national monument. Some were too hot for the dogs and had no water, but finding this one was perfect and we were so happy!

There was also a waterfall! A pleasant surprise and Summit loved it!

Then it was to the in and out, in and out of the slot canyons.


We try and be responsible pet owners as much as we can be. We pick up after them and even if it’s inconvenient we carry their poop bags out. We are lucky to be able to have them and we will not be part of ruining that. I know that some argue what is the difference between dog and horse? I think they need to do some research on google and it will be an easy answer.

We got through all the slot canyons at just over 2 miles and turned around at the fun arch.

Ramey lead us home!

Getting To Willis Creek Slot Canyon
The trail head is on Skutumpah Road. Not the easiest of roads, but we saw sedans get to the trail head. Do not detour off the road, when you make it over the small dam, you are about half way there. This is not a large parking lot, so nothing more than a van.

Parking Lot Coordinates: 37.483069, -112.096863
Peek-a-Boo & Spooky Canyons
Hiking Peek-a-Boo & Spooky Canyons
Miles: 2.5 ♦ Elevation Change : 300′ ♦ Trail Type: Loop ♦ Trail: Moderate (Difficult at spots)
Hike 29/52 in the Challenge!
I had read a lot about this hike. You can make it a lollipop loop, or hike to each however you want. We stopped at the visitor center to get the print out for this hike and we were glad that we did. Even though we were prepared, we still got a little turned around and ended up starting at Spooky, rather than Peek-a-Boo. We had every intention of doing the loop until we started at the wrong canyon.
The hike starts right at the second parking lot (read more about the parking lots below). Kevin is heading in the wrong direction. The trail is behind the register. 🙂

After you head on the trail there is a left that you need to make to go to Peek-a-Boo first. This was the suggested route. Locate the LARGE cairn and head down into the wash.

We missed this left turn completely and stayed on what looked like a trail. It didn’t take long until we realized that we were off the trail. Just under a half mile, but we did get an amazing view of the area.

We were able to find our way down into the wash and luckily we ended up right at a spot with cairns to get to the trail to one of the canyons.
You walk from one wash to another and you can’t miss the entrance to the canyon.

We started playing peek-a-boo when we got the canyon, of course thinking it was Peek-a-Boo Canyon. Can you find Kevin?
Eventually we stopped and started to think that maybe we were in the other canyon, Spooky. You reach this rock that looked like a heart stuck in place. You had to crawl underneath to get to the next part.
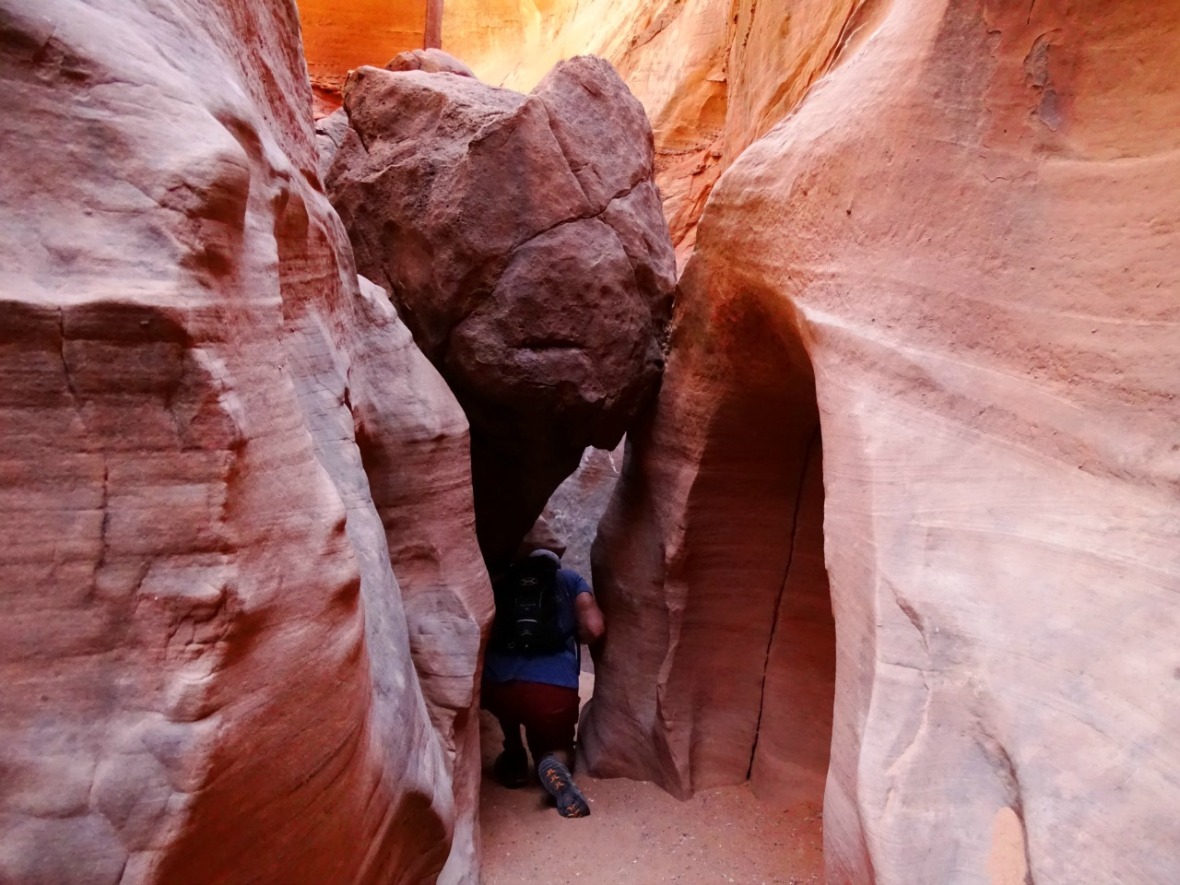
The canyon walls then narrowed to about 10 inches and we realized that we were definitely in Spooky Canyon.

It was fun at first trying to wiggle our way through the canyon. We read that you can go all the way through of course to make it a loop with Peek-a-Boo.
")
")
Then it felt like it narrowed even more and with no end in sight and with no ability to turn and run if we needed to, we decided to turn around.

One last stop at the heart.

Then we exited in comfortable fashion.

If you end up doing this make it back to the first wash and take a right.

It’s a very short distance between the two canyons. You can’t miss the entrance to Peek-a-Boo. This is potentially the most difficult part of the entire hike (other than the uphill back to the car on the correct trail. You will need to climb up a 12 foot wall with only a couple foot holds. Kevin managed with great form. I was a little more amateur.

This canyon keeps you very active. You are always climbing up something, around something or under something. Can you tell we had fun!

")
")
It was beautiful in the canyon. They are all unique and this one felt like a jungle gym!
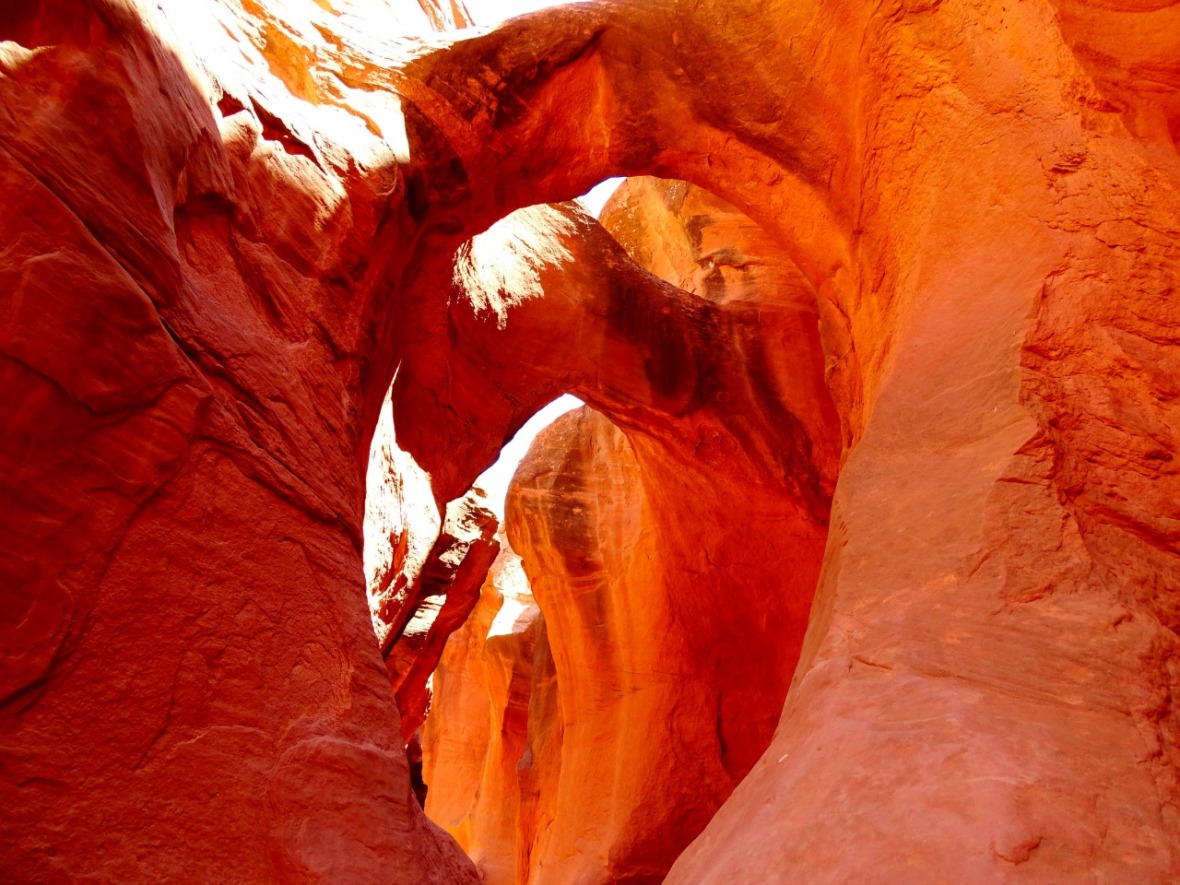
The jungle gym continued with tall windy walls and other obstacles.

")
")
We decided to not go the entire way through and instead turned around to have one more view of the beautiful arches and attempt our way down the 12 foot wall.

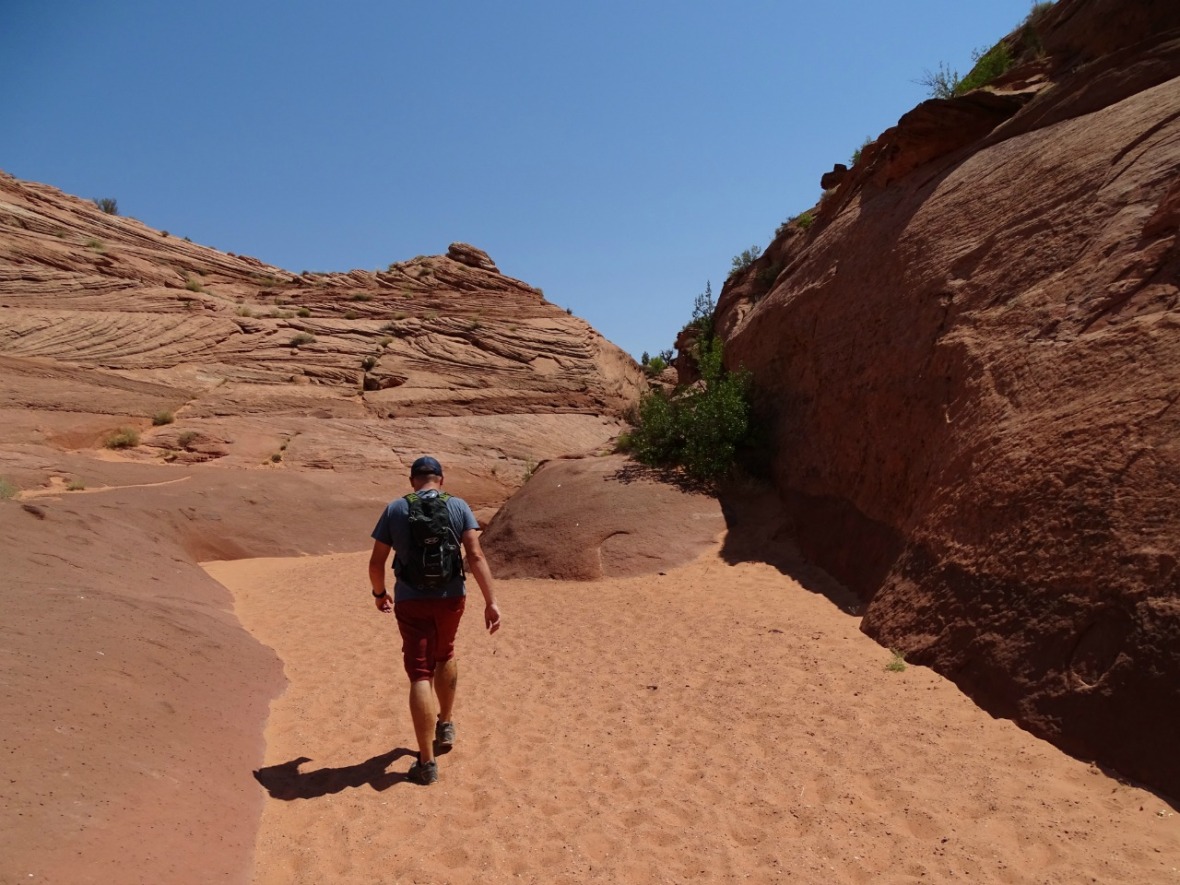
After getting down, it was easy enough to find the trail that we should have taken down into the canyon. It was right across the wash from the entrance. It was a short haul up the canyon, mostly sand and no shade.
Getting To Peek-a-Boo & Spooky Canyons
You have to drive 17 miles down Hole In The Rock Road. This took us at least 45 minutes. This gravel road is no joke, so just prepare yourself for that. Your first turn is on Dry Fork Road. There is a small brown sign on the road and you can also follow your map. Make sure to get a map and print out at the visitor center. After .25 miles is the first parking lot. The first parking lot is for low clearance vehicles. If you have to park there, you will then have to hike an additional 1 mile on the road to the second parking lot and the trail head. If you are able to take the road to the second parking lot, make sure to make it all the way to the parking lot, sometimes vehicles park too early. The road to the second parking lot is definitely for high clearance vehicles, don’t risk it. We almost bottomed out and were driving at a decent angle for some time.
Turn off for Dry Fork Road: 37.466668, -111.224106
First Parking Lot Coordinates: 37.465646, -111.212319
Second Parking Lot and Trail Head Coordinates: 37.476588, -111.220243
Here is a map to make it a loop.

Lower Calf Creek Falls
Hiking Lower Calf Creek Falls
Miles: 6 ♦ Elevation Change : 882′ ♦ Trail Type: Out and back ♦ Trail: Moderate
Hike 30/52 in the Challenge!
We were looking for something a little different. The desert and the canyons were beautiful but what else did the national park have to offer in terms of moderate and half day hikes. This seemed like a great option and we love waterfalls.
After you get to the parking lot you have to walk up the campground road for about .3 miles to the trail head.

The hike is relatively easy through sand and around some rocks. It does provide beautiful views of the canyon walls.


There isn’t much shade until you get to the falls and then you have lush trees to hide you from the sun while you take in the beauty of Lower Calf Creek Falls.

Even though it was quite hot, the water was still too cold! Bring snacks or lunch, it really is a great place to hang out for an afternoon.

Getting To Lower Calf Creek Falls
No gravel roads to get to this trail head. Yay! Continue on UT 12 past Hole in The Rock Road. This drive is beautiful and has multiple points to stop and take pictures. A small part reminded me of the Moki Dugway in Valley of the Gods, Utah. Nothing scary, just beautiful. The turn to Calf Creek Campground, where the trail starts, is on your left and easy to miss.
There is a large parking lot and some extra parking for larger rigs before you get to the parking lot. If you have anything over 20′ I suggest you stop at one of the gravel lots before. The campground is for tenters, truck campers and vans. They have bathrooms, picnic tables and 2 faucets with filtered water!
This trail is also dog friendly. There is little water to get in between the parking lot and the actual falls so make sure to bring extra for them and I would highly suggest booties. The sand and rocks get really hot in the summer, but they will have a ball when they get to the falls.
Parking Lot Coordinates: 37.793854, -111.414918
Trail Head Coordinates: 37.795717, -111.413635
Know Before You Go To Grand Staircase – Escalante National Monument
Visitor Centers
There are two visitor centers. One in Cannonville and one in Escalante. When you get a map of Grand Staircase – Escalante National Monument you will be able to tell which visitor center you need to stop at to get information. They will let you know as well if they think you should go to the other. We stopped at both. The one in Escalante is very nice. Both have bathrooms and plenty of information for you. Just make sure to get one map of the entire national monument and a print out of the hike you want to do (if they have one).
Visitor Center in Cannonville: 10 W Center St, Cannonville, UT 84718
Visitor Center in Escalante: 755 W Main St, Escalante, UT 84726
Hole in the Rock Road
This road has the trail heads for many of the hikes you will read about in Escalante. The road starts about 4.5 miles east of Escalante on UT 12 and is a total of 55.5 miles. The farthest we went on it was the 17 miles to Peek-a-Boo/Spooky Canyon. I did not care to do it again or take it farther. Next time we will hopefully be able to camp at the trail heads so we do not have to keep driving that road. It is not fun. Plan for plenty of time if you are driving it.
Camping
We missed a lot of the full day and what would be considered “strenuous” hikes because we were not staying in the area. We did not have the option of staying overnight at a trail head either. So we definitely suggest staying in the area or camping at a trail head the night before to get an early start and to get more hikes in. Or back country if you can.
There are campgrounds and boondocking available in the immediate area, so there are plenty of options.
Weather
It gets hot fast here in the summer. We would get onto the trails as early as possible but it was still 80+ degrees by 10:00 a.m. In the slot canyons it was definitely cooler, but getting to and from you were out in the open with no shade and usually hiking through sand. So bring plenty of water for each person. We were warned at the Escalante visitor center that a man had died a couple days earlier from the heat and to not take it lightly. After our run in at Canyonlands National Park, we were extra prepared.
I absolutely loved our time in Grand Staircase – Escalante National Monument. I hope that you are able to experience and explore this beautiful area. KEEP UTAH WILD!
Love to Pin, use this one!


wow! all of these hikes look amazing!! 😀
LikeLiked by 1 person
On my bucket list! I would love to do all of these hikes.
LikeLike
The Zebra Slot trail looks amazing. Do you think it is easy enough for kids?
LikeLiked by 1 person
Yes! You won’t get through the entire way, but you can definitely get to the fun part of Zebra!
LikeLike
You’ve inspired me! I really want to do this trip and these hikes.
LikeLiked by 1 person
Those rock formations are nuts!! It looks like an awesome place to visit! I think I would freak out in those tiny narrow passages though, I would have turned around way earlier!
LikeLiked by 1 person
This is a wonderful article explaining the hikes and showing photos of them. I don’t think I’d made it through some of those narrow slots. I’ve done the Calf Creek Falls hike – amazing!
LikeLiked by 1 person
Thank you! It was an amazing time there!
LikeLike
thanks for all the information, great photos
LikeLike
oh man slot canyons are so cool! thanks for the views!
LikeLike